Using the Device
No skill other than reading and using one's hands for many steps is necessary for setting up the TD Pilot device. Follow this User´s Manual and the Getting Start Guide.
Starting the Device
Start the devices the following way:
- Press the power button on the iPadOS Device. (Position 6 in Ports, Sensors and Device Buttons)
- Press the power button near the the top of the TD Pilot Base device. (Position 9 in Ports, Sensors and Device Buttons)
When you have started the device, the Power LED will shine in Red, pulse Blue or Green.
For example, solid blue indicates that it is charging but NOT powered on. If the LED is PULSING (any color) the TD Pilot is ON. Otherwise it is OFF.
For more information about the LED Behavior, see The Status LED Behavior.
Shutting Down the Device
The iPadOS device and TD Pilot Base shut down independently. The TD Pilot Base can only be shut down using the power button.
Usually the iPadOS device never needs to be shut down, just like a mobile phone. When the screen is locked the iPadOS device battery lasts for days without charging.
To power off the TD Pilot Base, push and hold the power button (Position 9 in Ports, Sensors and Device Buttons) for 3 seconds. If, for some reason, the accessory crashes or is unresponsive hold the power button for 10 seconds will force a shutoff.
First Start Up
When you start your TD Pilot for the first time, you are required to go through the Apple out of the box experience. At the end of setup the TD Pilot. specific apps will be installed on the Apple iPadOS device. The entire set up process takes between 10-15 minutes.
Setting Up Eye Gaze Access
If Applicable
Do NOT enable iPadOS eye tracking settings under Settings/Accessibility/Eye Tracking. It will interfere with the TD Pilot Eye tracking.
Configuring the iPadOS for Gaze Access
Step | Location | Action |
1 | Select Settings | |
2 | On the left side | Select Face ID & Passcode.
|
3 | On the right side | Toggle USB Accessories ON, under ALLOW ACCESS WHEN LOCKED.
|
4 | On the left side | Select Home Screen & Dock. |
5 | On the right side | Select Use Large App Icons, under APP ICONS. |
6 | On the left side | Select Display & Brightness. |
7 | On the right side | Select Dark, under APPEARANCE. |
8 | Select Text Size. | |
9 | Move the Text Size slider all the way to the right.
| |
10 | On the left side | Select Display & Brightness. |
11 | On the right side | Select View.
|
12 | Select Zoomed. | |
13 | Select Set. | |
14 | Select Use Zoomed, in the popup. | |
15 | On the left side | Select General. |
16 | Select Shut Down | |
17 | Press the power button on the iPadOS Device to restart the device. (Position 6 in Ports, Sensors and Device Buttons). | |
 (in iPadOS).
 Not available on funded/managed devices.
Setting up AssistiveTouch
AssistiveTouch is designed for people who have difficulty touching the screen. The AssistiveTouch menu allows you to do "touch" functions, such as tap and scroll, using eye gaze. It also provides gaze-accessible shortcuts to things like the Home screen and App Switcher, typically accessed through gestures. AssistiveTouch is used for access via eye gaze in all iOS apps, except TD communication apps, including TD Snap® and TD Talk.
AssistiveTouch is not intended to be used for TD Snap® and TD Talk. TD Snap® and TD Talk apps allow for eye gaze input without AssistiveTouch enabled.
Step | Location | Action |
1 | Select Settings | |
2 | On the left side | Select Accessibility. |
3 | On the right side | Select Touch, under PHYSICAL AND MOTOR. |
4 | Select AssistiveTouch | |
5 | Toggle AssistiveTouch ON.
You will see the Pointer, which shows the location of your eye gaze. The AssistiveTouch menu button appears on the right side of the screen.
| |
6 | Drag the AssistiveTouch menu button to the top third of the screen on the right side. | |
Customizing the AssistiveTouch Menu
Step | Location | Action |
1 | Select Settings | |
2 | On the left side | Select Accessibility. |
3 | On the right side | Select Touch, under PHYSICAL AND MOTOR. |
4 | Select AssistiveTouch. | |
5 | Select the Customize Top Level Menu. | |
6 | Select + to change the number of icons to 8. | |
7 | Select Notification Center. | |
8 | Swipe to the bottom of the list. | |
9 | Select Toggle Pause/Resume Dwell. | |
10 | Tap anywhere outside the list to close it. | |
11 | Select the Gestures button. | |
12 | Swipe to Move Menu. | |
13 | Select Move Menu. | |
14 | Tap anywhere outside the list to close it. | |
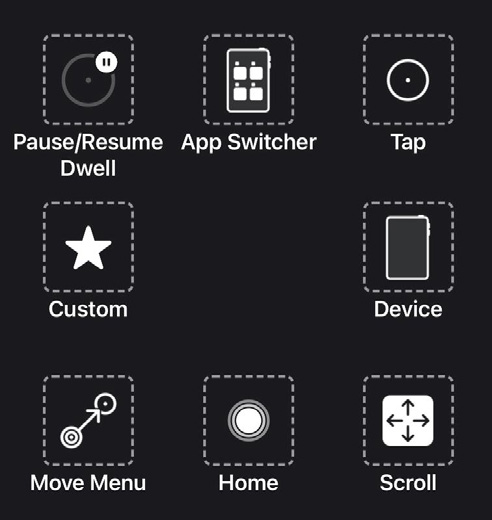
15 | Continue editing the menu icons until your menu matches this: | |
|
|
AssistiveTouch Menu for TD Talk | AssistiveTouch Menu for TD Snap |
Configuring Dwell Control
Step | Location | Action |
1 | Select Settings | |
2 | On the left side | Select Accessibility. |
3 | On the right side | Select Touch, under PHYSICAL AND MOTOR. |
4 | Select AssistiveTouch. | |
5 | Swipe to the Dwell Control | |
6 | Toggle Dwell Control ON. | |
7 | Swipe to the bottom. | |
8 | Select the – (minus sign) next to Seconds to change the dwell time to 1.5 seconds.
| |
9 | Swipe up from the center bottom of the screen to go to the Home Screen. | |
Waking and Unlocking Your Device
Your TD Pilot wakes automatically when the eye tracker detects your eyes. Unlock the TD Pilot by selecting the AssistiveTouch Button, then Home.
Try it now:
- Press the power button on the iPadOS device (Position 6 in Ports, Sensors and Device Buttons) to lock the TD Pilot.
- Look at the screen for a few moments.
- The TD Pilot will wake and display the lock screen.
- Tap or use your eyes to select the AssistiveTouch menu button.
- Select Home.
If you are interested in extra security on your device, we recommend using Face ID. Face ID allows you to unlock your TD Pilot without entering a passcode each time.
Set up Face ID in iPadOS Settings > Face ID & Passcode.
Using Apps with AssistiveTouch (if Applicable)
When you are ready to venture outside of your communication software, you’ll use AssistiveTouch to access the other apps on your iPad. The AssistiveTouch eye gaze settings and behaviors are different from the ones in your communication software, so you may need to make adjustments in the iPad OS Settings.
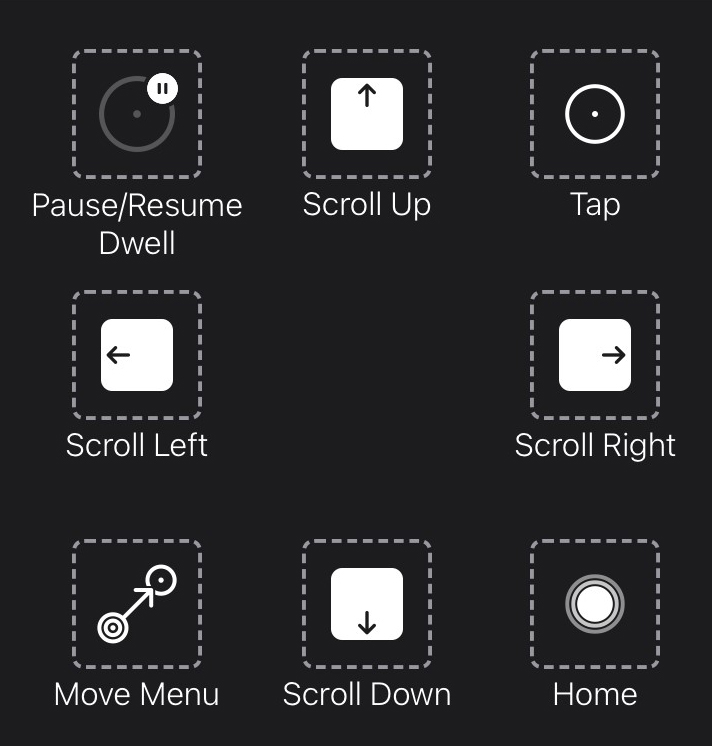
|
|
AssistiveTouch Menu for TD Talk | AssistiveTouch Menu for TD Snap® |
The AssistiveTouch Menu is an Eye gaze-accessible navigation tools that enable you to tap, swipe, adjust the volume, switch between apps, and more using your eyes.
Be sure to look at the Refining Eye Gaze cards if you are having any challenges using AssistiveTouch.
Accessing the AssistiveTouch Menu
TD Talk
- Fixate your gaze below the screen, in the middle of the eye tracker or the area of the eye tracker.
- The
(AssistiveTouch) button will become visible in the lower middle part of the screen.
- Select the
- The
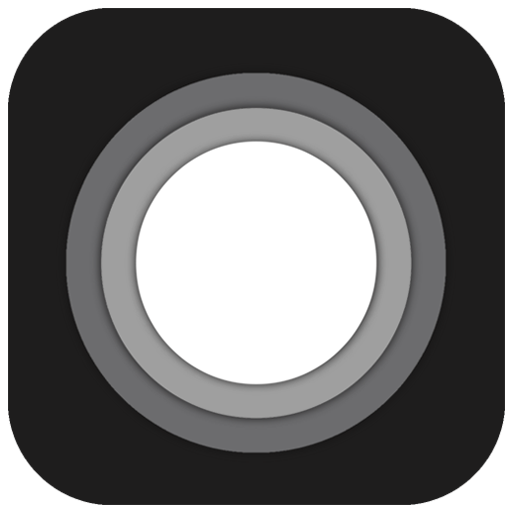 (AssistiveTouch) button will become visible on the screen.
 - Select the (AssistiveTouch) button to open the AssistiveTouch Menu.
TD Snap
- Select the Dashboard button in the Toolbar.
- Select the Eye Gaze (iOS) button.
- Select the Start AssistiveTouch button.
- The (AssistiveTouch) button will become visible on the screen.
- Select the (AssistiveTouch) button to open the AssistiveTouch Menu.
Taking a Break When Needed
Pause the eye tracking to read or rest, then resume eye gaze when you wish.
- Access the AssistiveTouch menu.
- For more information, see Accessing the AssistiveTouch Menu
- Select the Pause Dwell to pause the eye tracking.
Repeat the steps to resume eye tracking.
Using the Device with your Eyes
Tap and Scroll are available in the AssistiveTouch Menu on the top level. Other touch gestures such as Hold and Drag, Long Press, and Double Tap are found under Custom in the AssistiveTouch Menu.
To scroll
- Access the AssistiveToouch menu.
- For more information, see Accessing the AssistiveTouch Menu
- Depending on the communication software:
For TD Talk: | For TD Snap: |
|---|---|
|
|
AssistiveTouch falls back to Tap after you perform a different action like pause or scroll. You can change the action it falls back to or remove it altogether in: iPad OS Settings > Accessibility > Touch > AssistiveTouch > Fallback Action.
Moving the AssistiveTouch Button
You may need to move the AssistiveTouch Button around the screen to get it out of your way.
- Access the AssistiveToouch menu.
- For more information, see Accessing the AssistiveTouch Menu
- Select Move Menu in the AssistiveTouch Menu
- Hold your gaze on the screen where you would like the AssistiveTouch Menu Button to be.
Choosing Appropriate Apps
Ask yourself these questions when considering apps for use with eye gaze.
- Do you have the skills (e.g., Tap, Scroll, Long Press) needed to use the app?
- If you do not have the required skills, is the app a good way for you to practice and build skills?
- Is the app of high interest? When you are motivated, you are more likely to work harder and persevere when trying to access difficult apps.
- Are there settings in iPad OS or TD CoPilot that can help make the app more accessible with eye gaze? For more information, see Refining Eye Gaze.
- Can you configure settings within the app to accommodate your current abilities? This might include changing from portrait to landscape, modifying response time or time out settings in games, replacing complex tasks (select and drag) with more simple ones (select), or displaying fewer choices on the screen.
Using Eye tracking
If Applicable
The TD Pilot devices operate with precision regardless of glasses, contact lenses, eye color or light conditions. Eye tracking enables you to control the iPad with your eyes using AssistiveTouch applications. AssistiveTouch allows you to interact with applications and can help hone in the eye tracking experience through a variety of settings
Positioning
Prepare the user to start using eye tracking by positioning them comfortably. If they use glasses, make sure that they are wearing them and that the lenses are clean.
Place the TD Pilot on your mounting system or a stable surface in front of the user at, or slightly below, their eye level at a distance of about 65 cm (25.6 inches).
If their head is tilted left or right, tilt the TD Pilot to match. It is important that the angle of the screen surface match the angle of the user’s face.
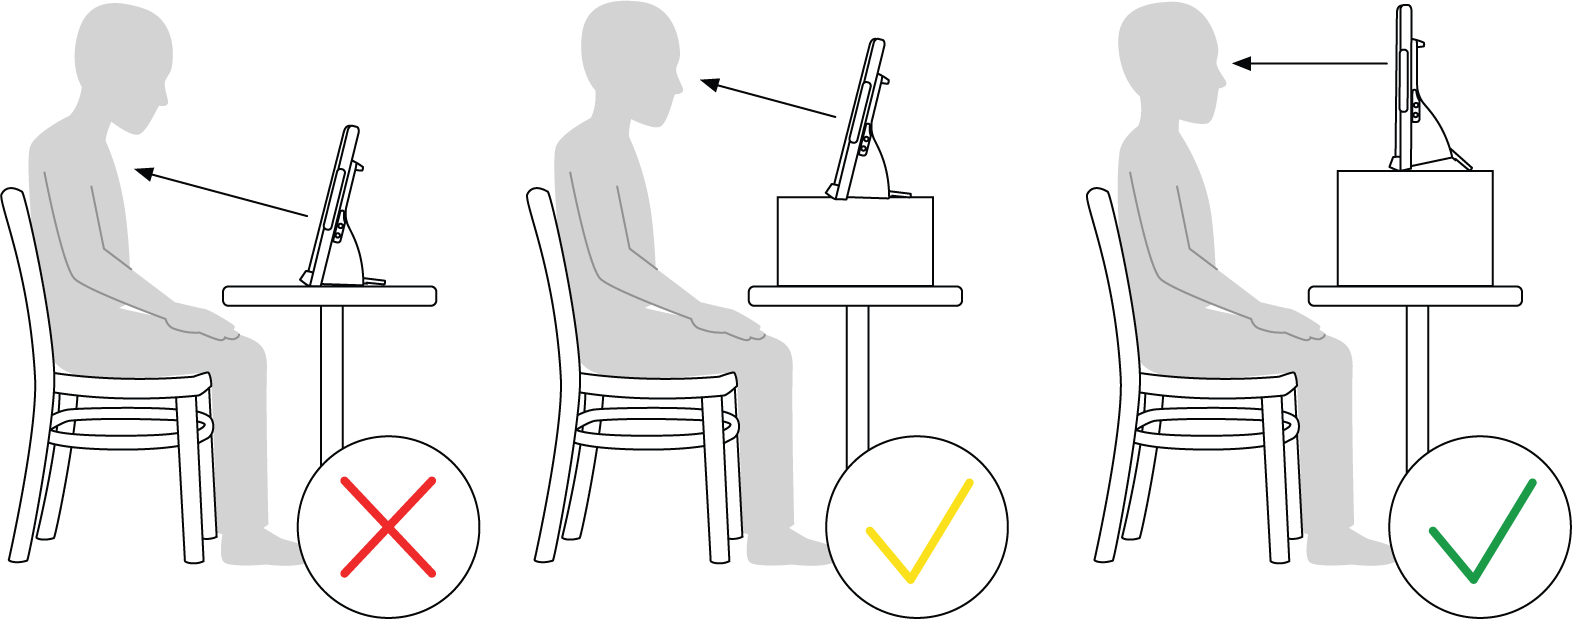
Most users, when seated at a table or desk, will need to have the TD Pilot positioned higher than the table surface.
You may need to refine the position of the device during the Calibrate steps, see Calibration .
Always adjust the position of the device to suit the user, not the other way around.
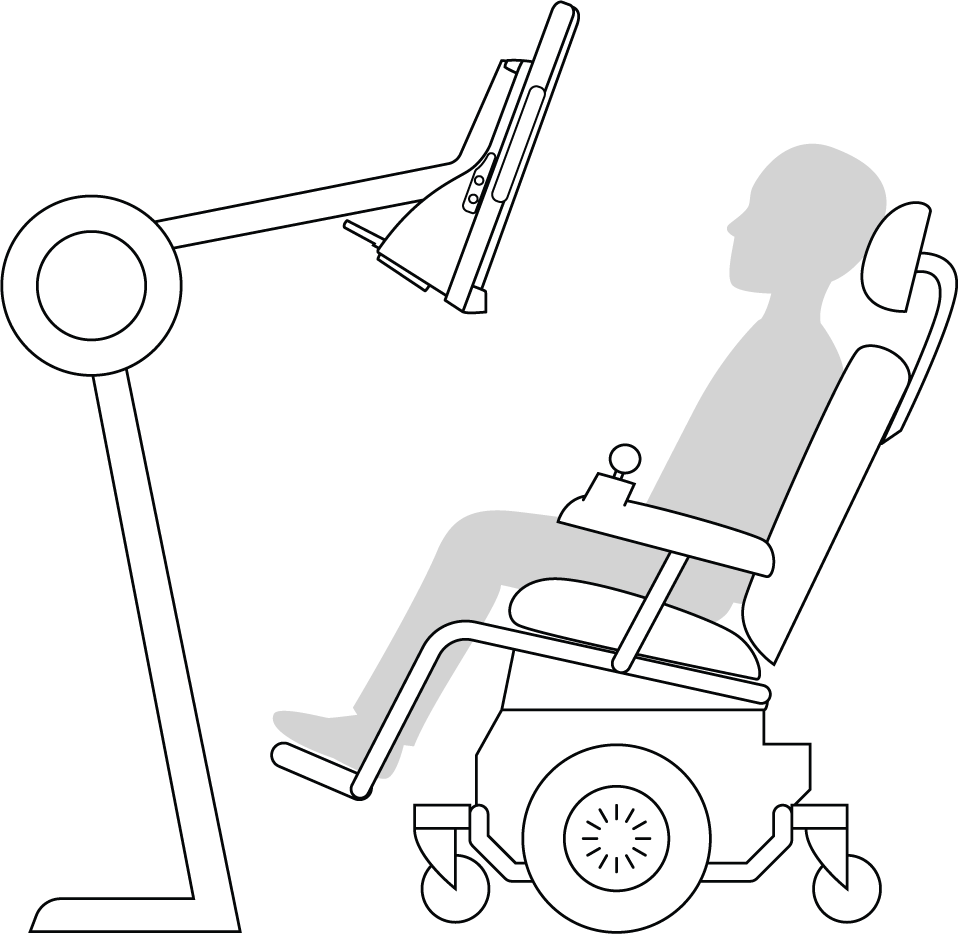
A mounting system is the best option for precise device positioning that is easy to adjust throughout the day. Several mounting options are available, including floor mounts, desk mounts, and wheelchair mounts. Visit www.TobiiDynavox.com or contact your local Tobii Dynavox partner.
Tips for Outdoor Usage
Here are some tips for better performance when using the eye tracker outside, especially in bright sunlight
- It may be beneficial to recalibrate at different points in the day due to environmental changes such as changing light or moving from indoors to outside.
- Use a baseball cap or similar to cast a shade on the eyes. This will significantly enhance the performance of the eye tracker.
- Avoid getting direct sunlight on the eye tracker for best eye tracking performance.
Positioning the TD Pilot in direct sunlight on a hot day may cause it to overheat.
Track Box
The TD Pilot allows for extensive freedom of head movement. Once the TD Pilot is properly calibrated and placed in front of the user, no further adjustments are required.
The TD Pilot produces an industry leading sized track box with the approximate dimensions of 30 cm × 20 cm × 20 cm / 11.8 in × 7.9 in × 7.9 in (Width × Height × Depth). The Track Box is an invisible box positioned approximately 60 cm (23.5 in) straight out from a point just above the middle of the screen.
At 70 cm (27.5 in) the TD Pilot allows for lateral Freedom of Head Movement in an area of about 50 × 36 cm (20 × 14 in) or 35 × 30 cm (13,8 × 11,8 in) depending on which Eye tracker the TD Pilot is equipped with. For more information, see Technical Specifications.
In order to function properly for Eye tracking, the user needs at least one eye in the track box at all times.
Track Status

The Track Status function is used to check if the user is correctly positioned in front of the eye tracker.
- The Eye Indicators, the two (2) white dots — represents the user’s eyes and how they are positioned towards the screen. For optimal position, the eye indicators should be in the middle of the black area.
- The colorful bar on the right with the white arrow — How far or close the user is positioned from the screen.
- If the white arrow is in the middle of the green area of the bar, the user is at the optimal distance from the screen.
- If the arrow is on the lower part of the bar — move the user closer.
- If the arrow is on the upper part of the bar — move the user farther away from the device.
- Select one of the following ways to access the Track Status:
- Select the Track Status button, position 13 in Ports, Sensors and Device Buttons, on the device.
- Open the TD CoPilot app by selecting the TD CoPilot
 icon.
icon. - Position the user.
Using the Adjustable Stand
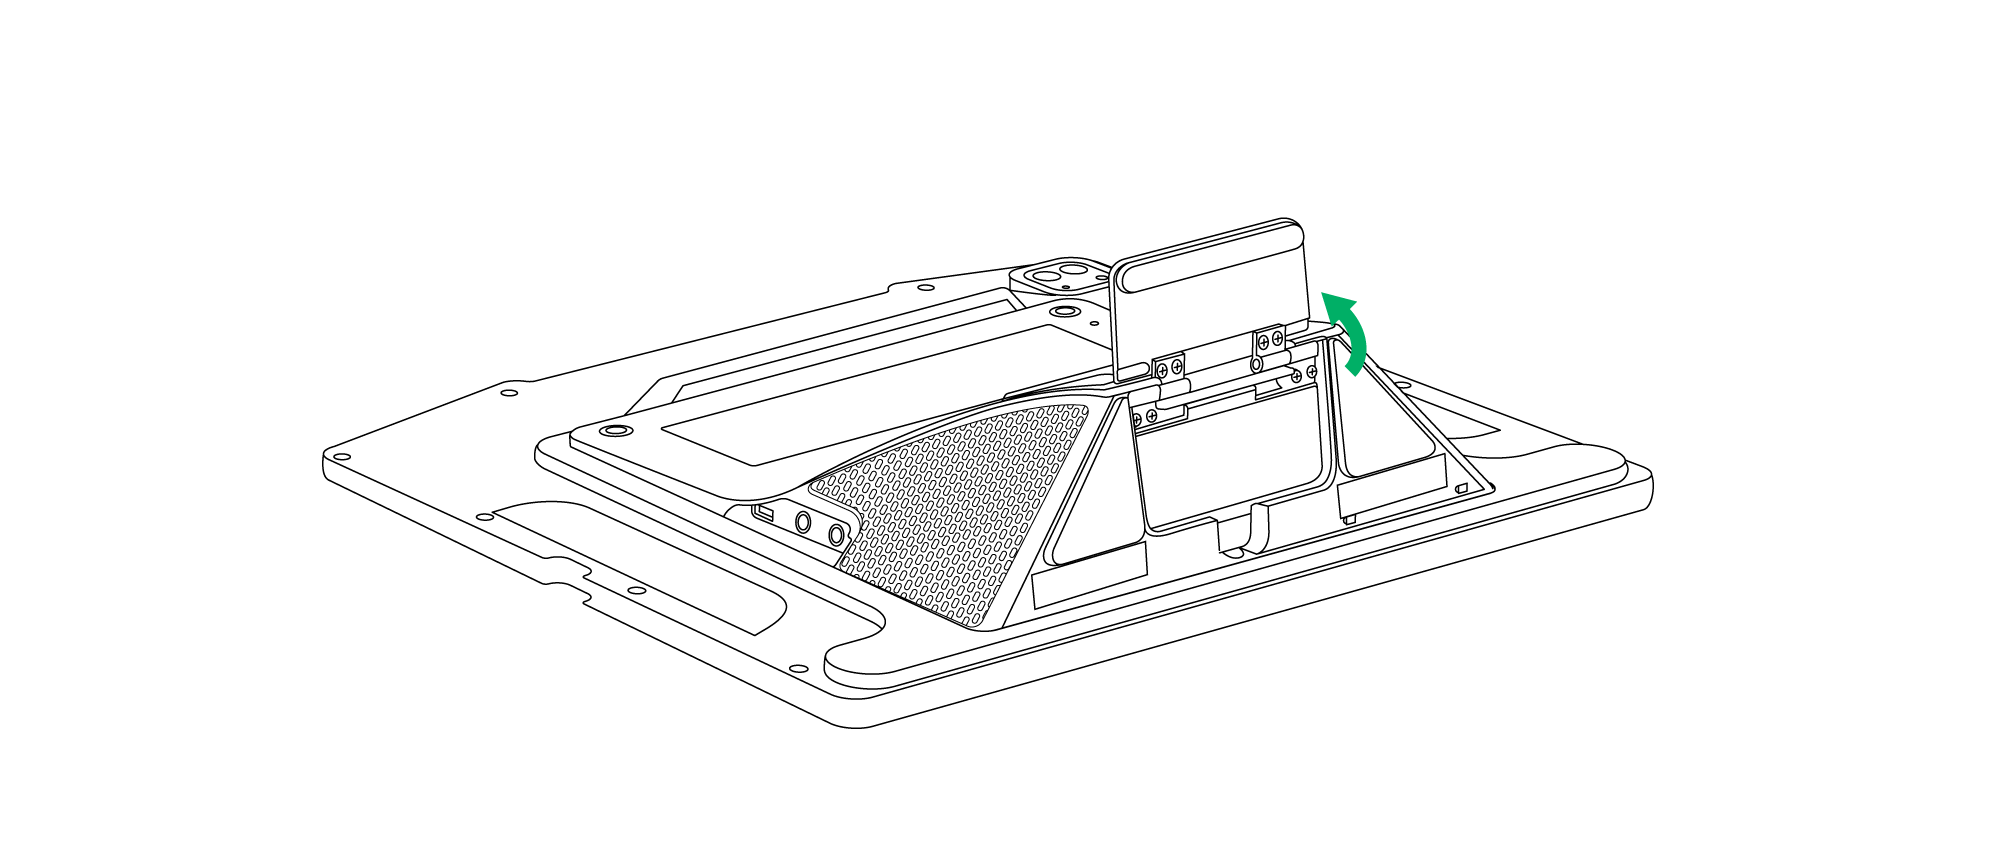
The TD Pilot comes has a built-in Adjustable Stand, which allows the user to place the TD Pilot device in more positions for the best possible Eye tracking.
To use the Adjustable Stand follow these instructions:
1 | Fold out the Adjustable Stand from its position in the bottom of the device. | |
|
| |
The Adjustable Stand is folded in underneath the bottom of the device. | Rotate the Adjustable Stand out to preferred position. | |
2 | Select in which position to use the Adjustable Stand. | |
|
| |
Place the TD Pilot in upright position. | Adjust the angle of the Adjustable Stand to give the TD Pilot a good alignment with the user. | |


Using the Partner Window
The Partner Window will mirror the Message Window in TD Snap® or TD Talk. For privacy, the user can toggle the Partner Window on/off from within TD Snap® or TD Talk.
There are also other options for the Partner Windows that can be toggled on/off like options for Show text while speaking and adding ellipsis while typing.
Adjusting the Volume
To adjust the volume use the Volume Up button and Volume Down button on the on the iPadOS device.
Volume adjustments can also be done in your Tobii Dynavox communication software.
For TD Talk, the user must use the volume controls in the Control Center of the iPadOS.
Starting the Device
Start the TD Pilot the following way:
- Press the power button on the back of the TD Pilot. (Position 9 in Ports, Sensors and Device Buttons)
The TD Pilot will automatically start up when charging the device if the TD Pilot is off.
When you have started the device, the Power LED will shine in Red, pulse Blue or Green.
For example, solid blue indicates that it is charging but NOT powered on. If the LED is PULSING (any color) the TD Pilot is ON. Otherwise it is OFF.
For more information about the LED Behavior, see The Status LED Behavior.
See also
Reset the Device
To restore the device to factory settings, see the following information:
Language | Link |
English | |
German | |
French | |
Spanish | |
Dutch | |
Swedish | |
Norwegian | |
Danish | |
Simplified Chinese | |
Japanese | |
Italian | |
Finnish | |
Arabic | |
Bulgarian |
Minimum IT and System Requirements
General
TD Pilot is a software-based medical device system that includes dedicated hardware and an integrated computing platform. Proper operation of the TD Pilot requires use within the system environment specified by the manufacturer. Use outside these specified conditions may result in reduced performance or loss of functionality.
Hardware Environment
TD Pilot is provided as a complete system consisting of manufacturer-approved hardware components, including an integrated iPad-based computing platform and eye-tracking hardware. No additional external computer hardware is required for the intended purpose of the TD Pilot.
The manufacturer-supplied hardware is configured and validated to support the installed operating system and device software. Only hardware components supplied or approved by the manufacturer shall be used with the TD Pilot.
Operating System and Software Environment
The TD Pilot operates on a supported iPadOS platform. The operating system version and system configuration are controlled and validated by the manufacturer as part of the TD Pilot system.
Only manufacturer-approved software applications, configurations, and compatible third-party applications shall be installed or used. Installation of unsupported software, modification of system settings, or use of unsupported operating system versions may affect device performance and is not recommended.
IT Network Environment
Network connectivity is not required for the device's primary communication functionality.
If network connectivity is used (for example, for software updates, license management, cloud-based services, or remote support), the device should be connected to a stable, standard TCP/IP network. Network availability and performance may influence these optional functions.
IT Security and Access Control
The device relies on the security mechanisms provided by the underlying operating system to support system integrity and data protection.
Access to the device should be restricted to authorized users through available device-level access control mechanisms. Users should follow general good practices for device security, including maintaining system access controls and applying manufacturer-provided software updates when available.