Preparation
This document describes how to prepare for your TD Navio Midi or TD Navio Maxi recall repairs. Follow the instructions to back up your device and communication app data, secure your personal information, and prepare alternative communication options.
When you have completed the steps in the Preparation section, proceed to Initiate the repair process
If you need help, please contact Support. We know this takes time and effort, and we are here to help.
NOTICE

Prevent data loss
Your device may be reset during the repair process. In the case of a reset, all of the personal data and settings on the device will be cleared. It is the responsibility of the user to back up device data prior to sending the device in for repairs. Failing to do so can result in permanent loss of the data. Follow the steps in this document carefully to back up your device.
Make a note of user account information
- Make a note of your Apple ID and password.
- Make a note of your myTobiiDynavox login and password.
How do I Create a myTobiiDynavox Account?
Go to Create a myTobiiDynavox account to create a myTobiiDynavox Account.
Back up your TD Navio with iPadOS
The information might show graphics from iOS, but the instruction is the same for iPadOS.
A device back up makes a copy of your device information, including personal files, apps, photos, and settings. The backup file can be used to restore your device back to the way it was after it has been reset. To back up your TD Navio, follow this instruction:
Language | Link |
English | |
German | |
French | |
Spanish | |
Dutch | |
Swedish | |
Norwegian | |
Danish | |
Simplified Chinese | |
Japanese | |
Italian | |
Finnish | |
Arabic | |
Bulgarian | |
Polish | |
Slovenian | |
Estonian | |
Portugese | |
Croatian | |
Icelandic | |
Hebrew |
See also
Connect your TD Navio to Wi-Fi
The information might show graphics from iOS, but the instruction is the same for iPadOS.
To connect your TD Navio to Wi-Fi, follow this instruction:
Language | Link |
English | |
German | |
French | |
Spanish | |
Dutch | |
Swedish | |
Norwegian | |
Danish | |
Simplified Chinese | |
Japanese | |
Italian | |
Finnish | |
Arabic | |
Bulgarian | |
Polish | |
Slovenian | |
Estonian | |
Portugese | |
Croatian | |
Icelandic | |
Hebrew |
Back up your TD Snap user
Back up to myTobiiDynavox (recommended)
- Select the
 Edit button.
 - Select the User tab.
- Select the arrow to the right of the current user.
- Select the
 Backup button beside the name of the user you would like to back up.
 - Select Backup to myTobiiDynavox.
- If you are not currently logged in to your myTobiiDynavox account you will prompted to do so now.
- Enter a name for your user backup file, then select Next.
- It may be helpful to include the backup date in the file name.
- Select Done.
Back up to a Local File
- Select the Edit button.
- Select the User tab.
- Select the arrow to the right of the current user.
- Select the Backup button beside the name of the user you would like to back up.
- Select Back up to a local file.
- Enter a name for the backup file.
- Select Backup.
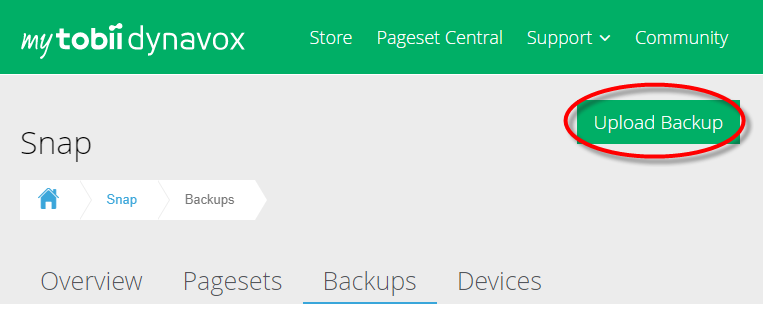
- Move or copy the backup file from Files > On My iPad > TD Snap > UserBackups to cloud storage or another device.
Local user backup files can also be moved to myTobiiDynavox manually. Use your web browser to go to myTobiiDynavox.com and log in, then go to Snap > Backups and select Upload Backup.
Back up your TD Talk user
- Start TD Talk (
 )
) - Select one of the following ways to access the dashboard.
- Fixate your gaze below the screen, in the middle of the eye tracker or the area of the eye tracker.
- Swipe up from the space bar.
- The
 (Dashboard) button will become visible in the lower middle part of the screen.
 - Select the (Dashboard) button to open the Dashboard.
- Select the
 (Settings) action to open the TD Talk Settings.
 - Look for the
 (Log in) icon in the top-left corner of the screen.
 - Use the keyboard to type in your user name in the Username field.
- Use the keyboard to type in your password in the Password field.
- Select the Log in button.
- Select the Backup button.
- The date the backup is made and from which device will show to the left of the Backup button when a backup is done.
- Select the
 (Close) button to exit .
Clear credit card information
The information might show graphics from iOS, but the instruction is the same for iPadOS.
To remove a payment method from your Apple Account, follow this instruction:
Language | Link |
English | |
German | |
French | |
Spanish | |
Dutch | |
Swedish | |
Norwegian | |
Danish | |
Simplified Chinese | |
Japanese | |
Italian | |
Finnish | |
Arabic | |
Bulgarian | |
Polish | |
Slovenian | |
Estonian | |
Portugese | |
Croatian | |
Icelandic | |
Hebrew |
Optional: Print TD Snap pages for communication
While your device is being repaired, it is helpful to have printed communication boards available. Recommended pages to print: keyboards, Core Words, Quickfires, and Topics pages that you use most frequently.
If you don't have a printer connected to your device, follow the steps to save the PDF files to your iCloud or email or Airdrop them to yourself to print from another device.
Pre-made printable communication boards are also available for download in the section Resources
- Select the Edit button.
- Select the Page tab.
- Select
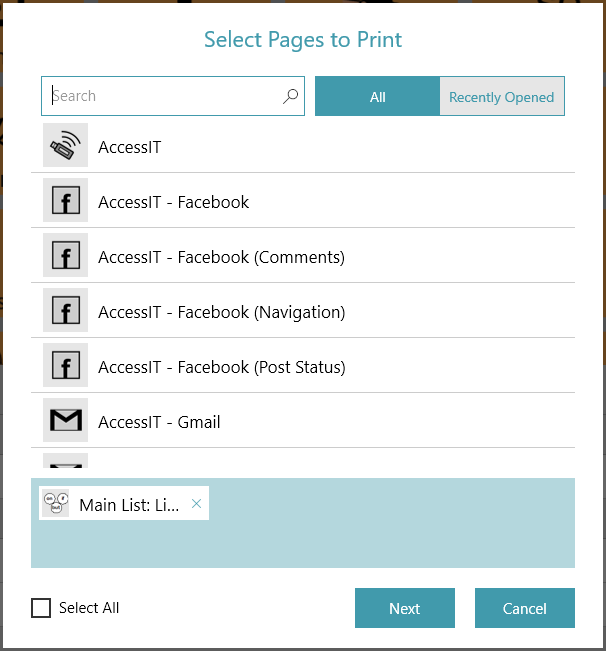
 Print in the editing toolbar on the right side of the screen. The Select Pages to Print dialog opens.
 - You can also print from the Print Pages section on the Page tab.
- The current page is added to the print queue by default. Select additional pages from the list to add them to the print queue.
- Type in the Search field to search by Page Name.
- To add all pages in the current search results to the print queue, check Select All.
- If you check Select All, then uncheck Select All, your print queue is reset.
- To remove pages from the print queue, select the X beside the page name.
- When the desired pages have been added to the print queue, select Next.
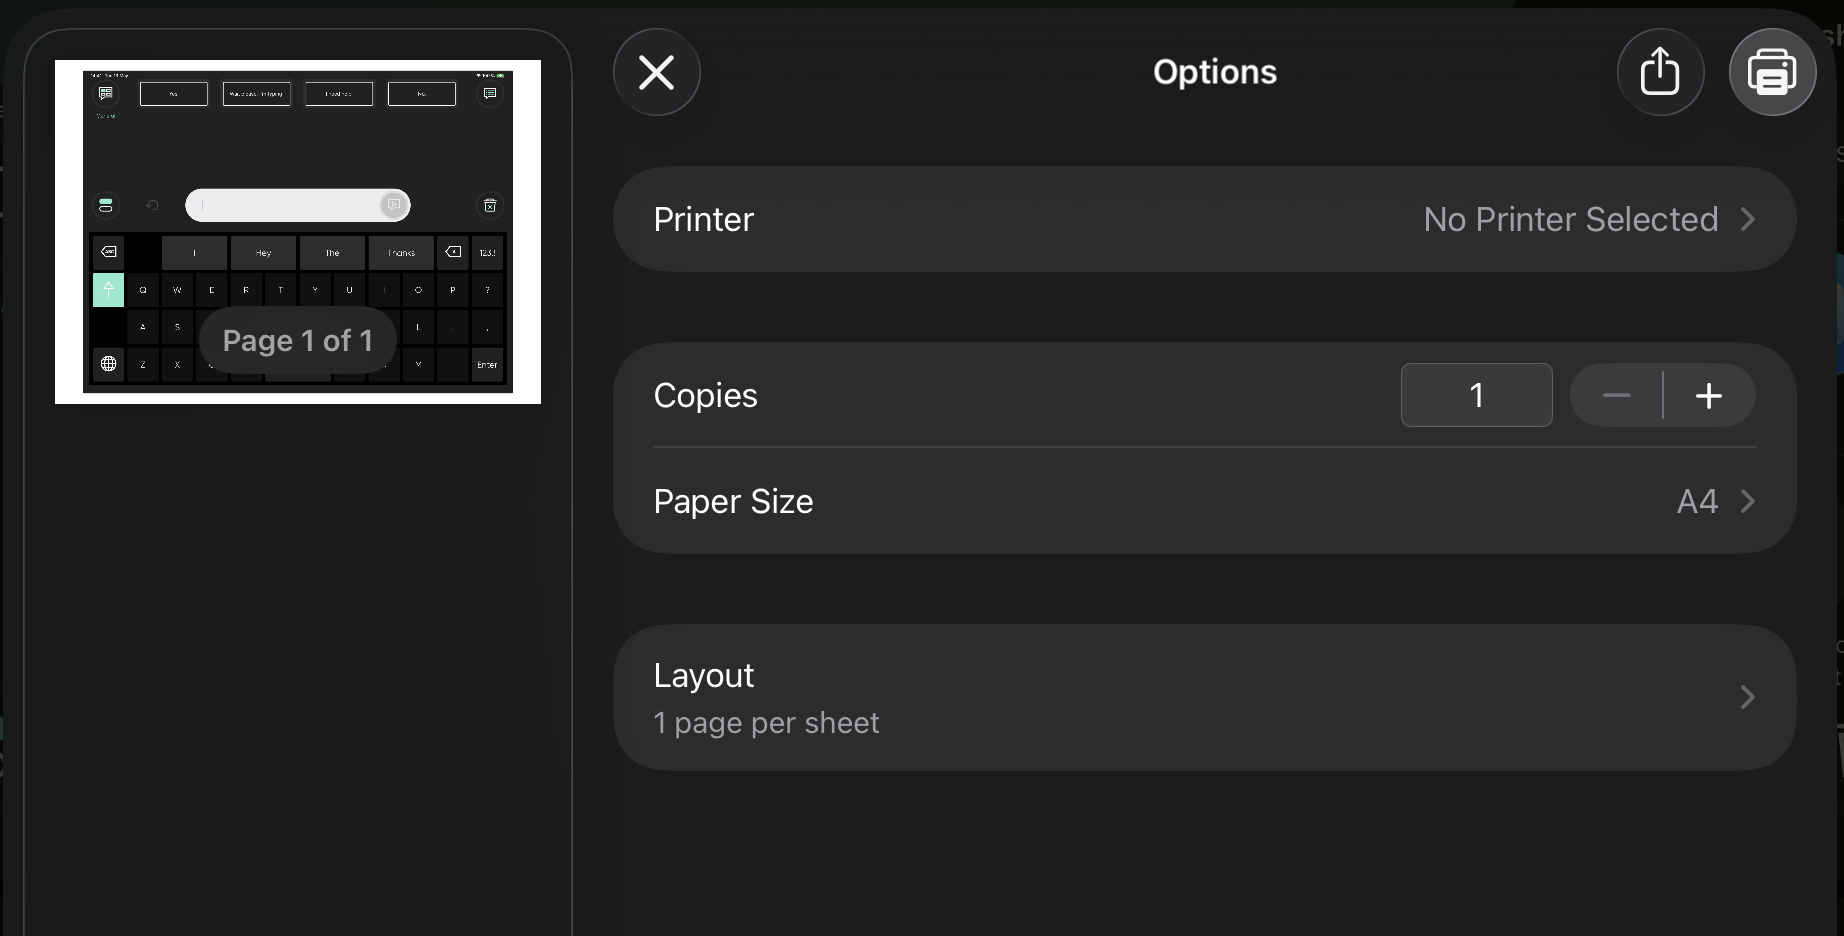
- Choose your print options. The page preview updates to reflect the current settings.
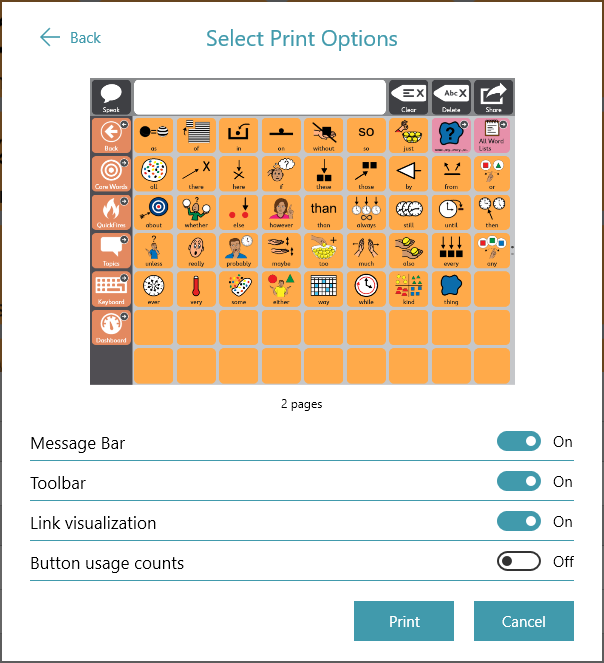
- Message Bar: Disable this setting to hide the Message Bar on the printed page(s).
- Toolbar: Disable this setting to hide the Toolbar on the printed page(s).
- Link visualization: Disable this setting to hide the link indicator icons on link buttons on the printed page(s).
- Button usage counts: Enable this setting to show the current button usage counts on the printed page(s). Note: Data tracking must be enabled to see button usage counts.
- When you have finished choosing your print options, select Print.
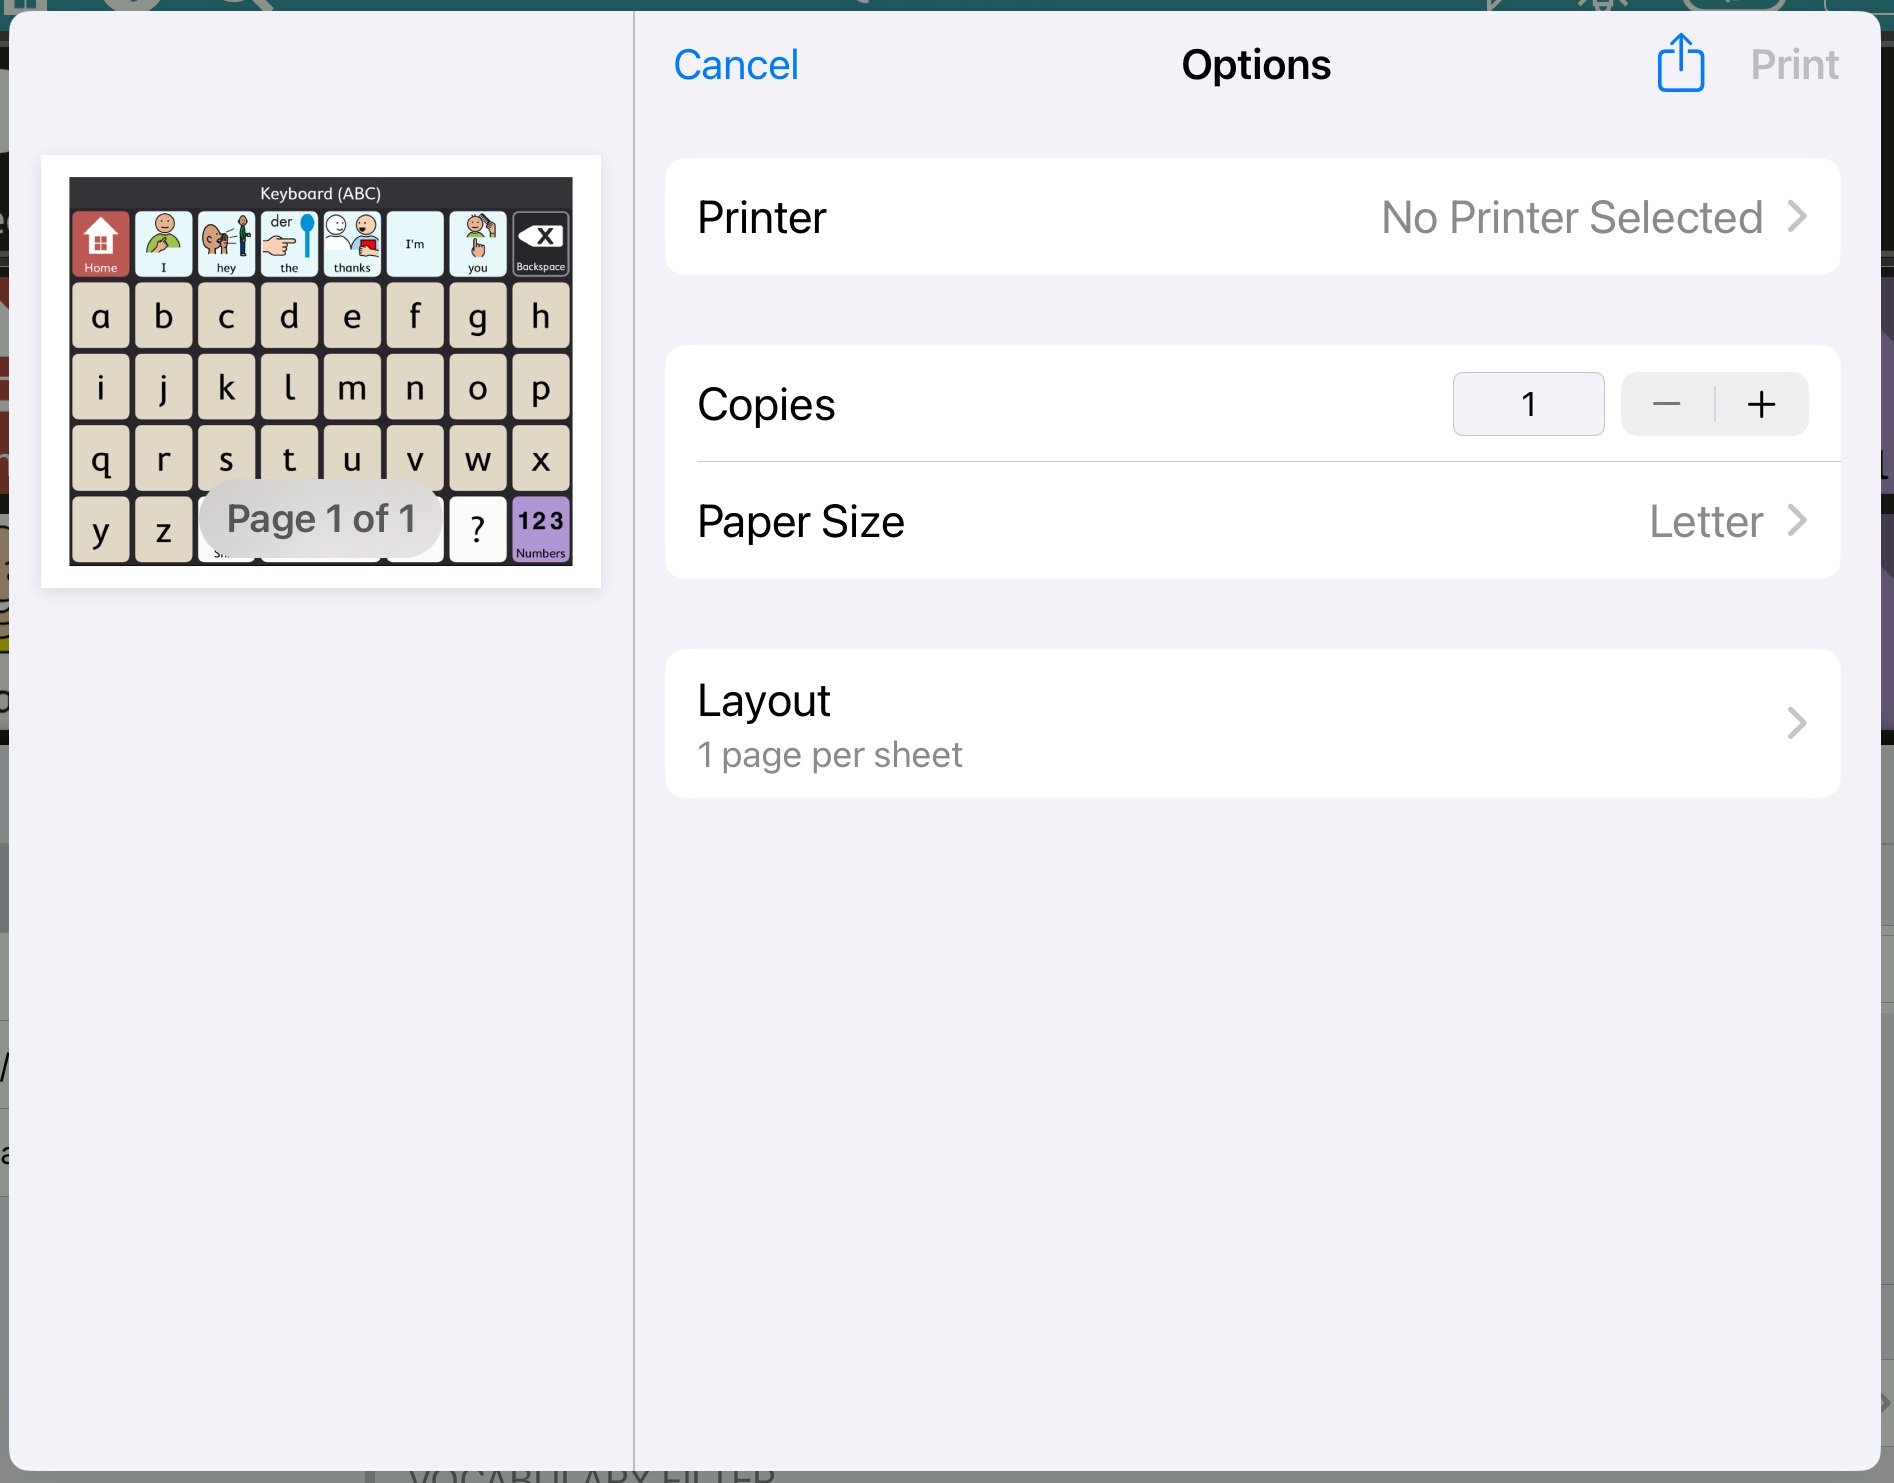
- Print or save as PDF.
- Send to your printer: Choose your printer and configure your preferred settings, then select Print.
- Save as PDF: Select
 Share, then choose an option for either sending the PDF to yourself via AirDrop, Messages, or Mail or select Save to Files to save to your iCloud drive. Access your PDF from another device with printing capability and print.
Optional: Print TD Talk pages for communication
You need to make sure your AirPrint-enabled printer and your TD Navio are connected to the same Wi-Fi network.
To print from TD Talk, follow these steps.
- Go to the page to print in TD Talk.
- Press the Power button and the volume + or volume - buttons at the same time.
- Select the new small window containing the screen shot in the lower-left corner of the screen.
- Select the
 (Share) button.
 - Select the
 (Print) button.
 - Print or save as PDF.
- Send to your printer: Choose your printer and configure your preferred settings, then select (Print) .
- Save as PDF: Select (Share), then choose an option for either sending the PDF to yourself via AirDrop, Messages, or Mail or select Save to Files to save to your iCloud drive. Access your PDF from another device with printing capability and print.
Optional: Download apps to a temporary device
If you have another compatible device available, such as an iPad, you can download your communication apps and restore your backed up user data to continue communicating while your TD Navio is being repaired.
Download TD Snap
- From the Home screen, open AppStore (
 )
) - Select the Search tab
- Search for TD Snap (
 )
) - Select the Get button next to the TD Snap app.
- Select the Install button.
- Enter your Apple ID password.
- Select the Confirm button.
- Select the Open button when the download is finished.
Download TD Talk
- From the Home screen, open AppStore ()
- Select the Search tab
- Search for TD Talk ()
- Select the Get button next to the TD Talk app.
- Select the Install button.
- Enter your Apple ID password.
- Select the Confirm button.
- Select the Open button when the download is finished.
Restore your TD Snap user
Before completing the steps below, in TD Snap go to Edit > User > myTobiiDynavox Account and log in using your myTobiiDynavox credentials. This will enable speech on this device using one of the companion licenses that are included with your TD Navio.
To manage your companion licenses, visit myTobiiDynavox.com, log in, and select My Account > Licenses.
Restore a user from myTobiiDynavox
- Select the Edit button.
- Select the User tab.
- Select the arrow to the right of the current user.
- Select New User.
- Select Restore Existing User.
- If you are not currently logged in to myTobiiDynavox, enter your email and password then select Next.
- Choose a user backup file from the list, then select Next.
Restore a user from a local file
Note: Before completing the steps below, you must copy your .sub backup file to Files > On My iPad > TD Snap > UserBackups
- Select the Edit button.
- Select the User tab.
- Select the arrow to the right of the current user.
- Select New User.
- Select Restore Existing User.
- Select Restore from a local file.
- Select a user backup file from the list, then select Restore User.
Restore your TD Talk user
- Fixate your gaze below the screen, in the middle of the eye tracker or the area of the eye tracker.
- The (Dashboard) button will become visible in the lower middle part of the screen.
- Select the (Dashboard) button to open the Dashboard.
- Select the (Settings) action to open the TD Talk Settings.
- Look for the (Log in) icon in the top-left corner of the screen.
- Use the keyboard to type in your user name in the Username field.
- Use the keyboard to type in your password in the Password field.
- Select the Log in button.
- Select the Restore button.
- The date the restore is made will show to the left of the Restore button when a restore is done.
- Select the (Close) button to exit .